Suche // Search:

Posts mit dem Label XML-Source werden angezeigt. Alle Posts anzeigen

20.10.2015

Markierung modifizieren
//
Modify check mark

Kontrollkästchen und Optionsfelder kommen immer sehr farblos daher.
Dieses Beispiel zeigt, wie man ihnen mehr Farbe und einen anderen Markierungsstil verpasst.


Check boxes and radio buttons are by default very colorless.
This sample demonstrates how you can give them more color and different check mark styles.


Beispiel
//
Sample
https://files.acrobat.com/a/preview/786f55fc-242d-460a-badf-12b80a6e28db

08.01.2014

Arbeiten mit Prototypen
//
Working with Prototypes

Beim Erstellen von XFA-Formularen muss man immer viel editieren, um ein einheitlichen Look hin zu bekommen.
Ja es ist mühselig all den vielen verschiedenen Feldtypen dieselben Farben und Fonts zuzuweisen, oder dasselbe Skript in mehrere Objekte zu kopieren. Fragmente oder eigene Objekte in der Bibliothek vereinfachen das zwar, haben aber zwei Nachteile. Zum einem ist das nachträgliche Ändern einer Eigenschaft genauso aufwendig, als wenn man jedes Objekt einzeln editiert und dann führen einzeln angepasste Objekte immer zu einer größeren Datei.

Für solche Zwecke bieten sich daher Prototypen an. Hier braucht man nur die Eigenschaften des Prototypen ändern und alle anderen Objekte erben diese Änderungen automatisch. So lassen sich z.B. Schriftarten, Farben, Ränder oder Skripte global anpassen. Ein weiterer Vorteil ist, dass die referenzierenden Objekte kaum Platz in der XML-Struktur benötigen, was die Dateigröße gering hält. Das macht sich vor allem bei Formularen mit hunderten Objekten bezahlt.

Klingt toll oder? Noch nie von gehört, was?! Nun ja, Prototypen existieren eigentlich schon immer in XFA, nur wirklich publik hat Adobe das nie gemacht.
Tatsächlich sind sie eingehend in der XFA Spezifikation beschrieben, aber wer liest schon ein 1.500 Seiten starkes Handbuch so genau durch?

Prinzipiell ist es ganz einfach mit den Prototypen.
Jedem Objekt, egal ob Teilformular, Feld, Border oder Skript, kann man ein id-Attribut (auch bekannt als XML ID) zuweisen, das es innerhalb des Formularentwurfs eindeutig identifiziert. Es wird dadurch zu einen Prototypen.
Ein anderes Objekt kann dann auf dieses id-Attribut referenzieren und erbt so alle Eigenschaften und Kind-Objekte des Prototypen.
Dafür fügt man dem Objekt ein use oder usehref-Attribut hinzu. Das use-Attribut kann dabei nur auf Prototypen innerhalb des Formularentwurfs zugreifen, das usehref-Attribut hingegen auch auf externe Formularentwürfe (*.xdp). Letzteres ist aber nur bei Serverlösungen interessant.

Creating XFA forms means a lot of editing to get a consistent look and feel.
It’s indeed a pain to assign all those different field types the same colors and fonts or to reuse the same script in different objects. Fragments and custom objects in a library already make such things easier but also have two disadvantages. Firstly it’s as complicated to change a property afterwards as when you edit each object separately and secondly the file sizes grows with every single edited object.

For those purposes prototypes are the best solution. There you only need to edit the properties of a prototype and all referencing objects automatically get the changes assigned. So you can edit fonts, colors, border or scripts very easy globally. A benefit of this method is, that the referencing objects need hardly any space in the XML source, which means a smaller file size. This is especially handy in forms with hundres of fields.

Sounds great, right?! Ok, you’ve never heard about before, didn’t you? Well, prototypes exists since ages in XFA, but never have been made such public by Adobe.
You can read about them in the XFA specs, but who’s ever reading a 1.500 pages strong manual completely?

Ok, the usage of prototypes is indeed easy.
Every object – no matter if it’s a subform, field, border or script – can have assigned an id attribute (also known as XML ID), which identifies these object within the template. By this id attribute the object becomes a prototype.
Another object then can reference to this id attribute and will inherit all properties and child objects of the prototype.
Therefore you add an use or usehref attribute to the object. The use attribute can only refer to prototypes within the current template while the usehref attribute can also refer to external templates (*.xdp). The second method is only interesing in server enviroments.


Einen Prototypen erstellen
//
Creating a prototype


Schritt 1 – Erstellen Sie ein neues Formular und platzieren Sie dort ein Textfeld.
//
Step 1 – Create a new form and place a text field somewhere.


Schritt 2 – Editieren Sie das Textfeld – ändern Sie Schriftart, Beschriftung, Hintergrundfarbe usw.
//
Step 2 – Edit the text field – change the font, caption, background color etc.


Schritt 3 – (optional) Ziehen Sie das Textfeld in der Hierarchie in den Ast "referenzierte Objekte".
//
Step 3 – (optional) Drag the text field into "referenced objects" within the hierarchy tree.


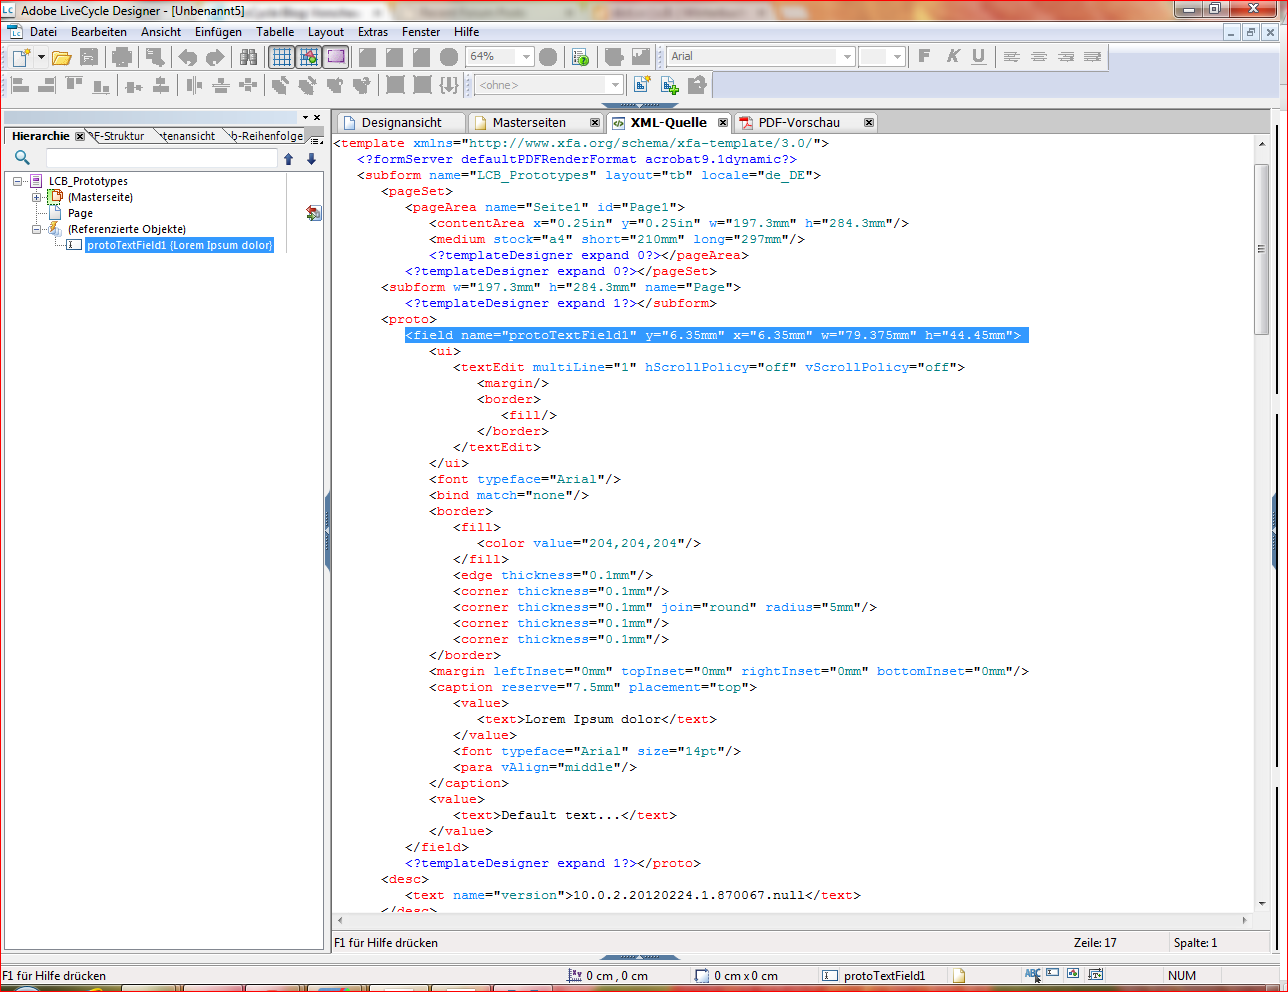
Schritt 4 – Wechseln Sie in die XML-Quelle und klicken Sie dann auf das Textfeld in der Hierarchie, damit die Ansicht direkt zu dem Feld springt.
//
Step 4 – Switch to the XML source view and click on the text field in the hierarchy so the focus is set onto the field.


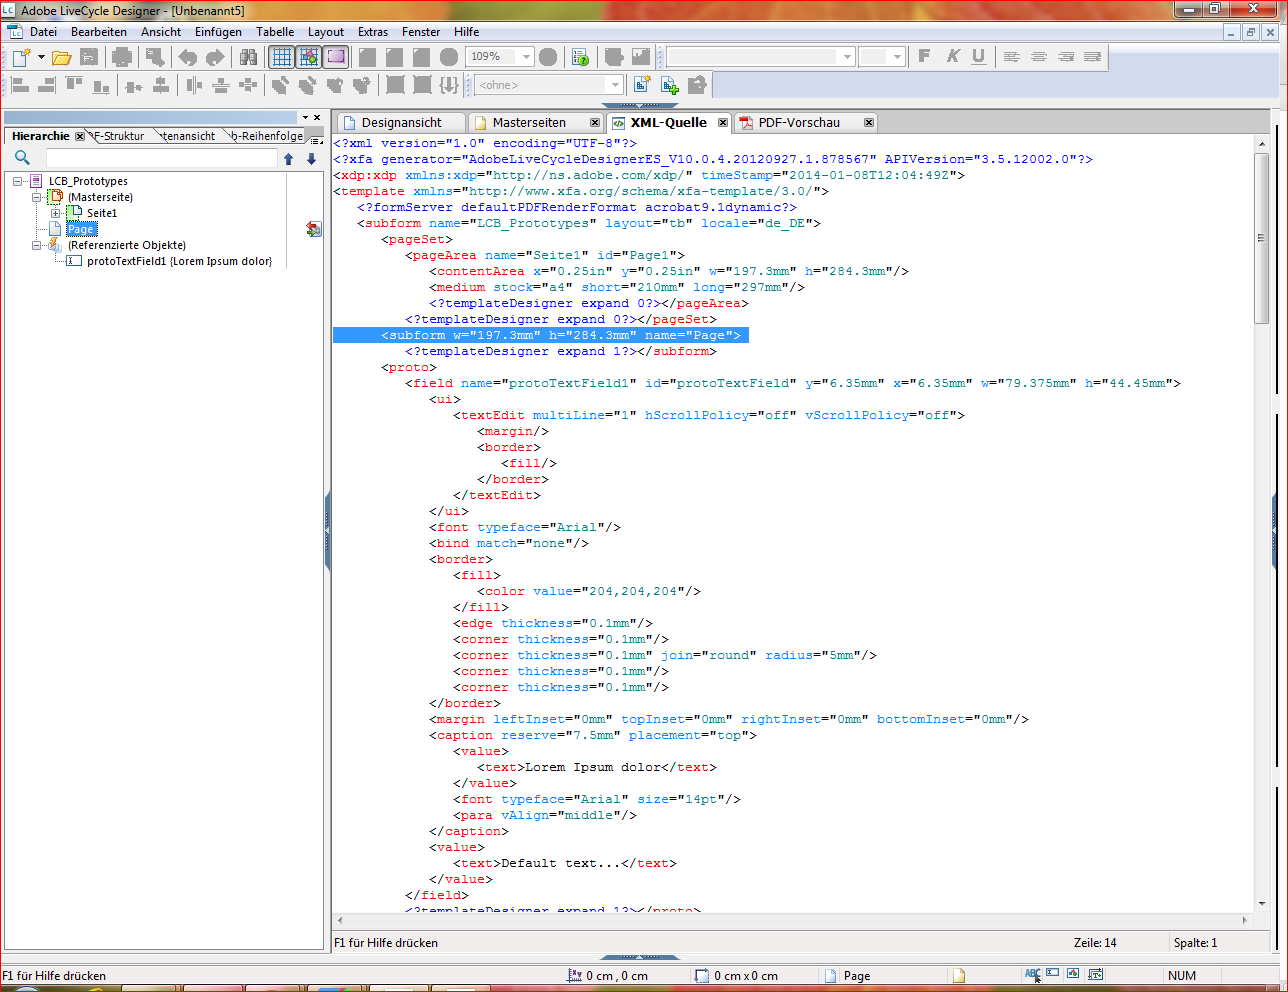
Schritt 5 – Fügen Sie dem <field>-Tag ein id-Element hinzu, z.B. id="protoTextField".
//
Step 5 – Add an id element to the <field>-Tag like id="protoTextField".

<!-- Feld mit XML ID // Field with XML ID -->
<field name="protoTextField1" id="protoTextField" y="6.35mm" x="6.35mm" w="79.375mm" h="44.45mm">
   ...
</field>


Einen Prototypen referenzieren
//
Referencing a prototype

Zum Referenzieren gibt es verschiedene Möglichkeiten.
Dem referenzierenden Objekt fügt man ein use-Attribute hinzu, dass einen Stringwert mit der Referenz zum Prototypen enthält.
Die einfachste ist die Verwendung der XML ID des Prototypen.
Der Stringwert beginnt mit hier mit einer # gefolgt von der XML-ID des Prototypen, also z.B. use="#prototypeId".

Die andere Möglichkeit ist der SOM-Ausdruck des Prototypen, also z.B. use="Form1.#proto[0].protoTextField".
Diese Methode ist nicht so flexibel, wie die mit der XML-ID, da man alle Referenzen manuell ändern muss, wenn sich der SOM-Ausdruck des Prototypen geändert hat.


There are a couple of methods to reference a prototype.
You add a use attribute to the referencing object, that has a string value with the prototypes reference.
The simplest method is the usage of the prototypes XML ID.
Therefore the string begins with a # followed by the XML ID, such as use="#prototypeId".

Another method is a SOM expression of the prototype, like use="Form1.#proto[0].protoTextField".
This one isn't that flexible as the one with the XML ID, because you have to correct each reference manually when the SOM expression of the prototype has changed.

Schritt 1 – Wechseln Sie in die XML-Quelle und platzieren Sie den Textcursor an der Stelle, wo ein neues referenzierendes Feld erstellt werden soll.
//
Step 1 – Switch to XML source view and place the text cursor where you want to add a new referencing field.


Schritt 2 – Geben Sie ein <field>-Tag mit dem use-Attribute in die XML-Quelle ein.
//
Step 2 – Add a <field>-Tag with the use-Attribute into the XML source.

<!-- Feld mit Prototyp-Referenz // Field with prototype reference -->
<field use="#protoTextField/>


Schritt 3 – Öffnen Sie die Design-Ansicht oder PDF-Vorschau, um das Ergebnis zu sehen.
//
Step 3 – Open the the Design view or PDF preview to check the results.


Hinweise
//
Hints

Zum Aktualisieren eines Prototypen stehen Ihnen alle Bedienfelder von Designer zur Verfügung. Nur sehen können Sie den Prototypen nicht, solange er unter "referenzierte Objekte" liegt. Bei kleinen Änderungen stört das nicht weiter, aber bei komplizierten Layouts schon. Dann sollten Sie temporär eine neue Seite erstellen und den Prototypen zum Bearbeiten hierher verschieben.

Die Änderungen an Prototypen sehen Sie nicht sofort bei den referenzierenden Objekten, da Designer das Template nicht neu läd.
Wechsel Sie daher in die XML-Quelle oder PDF-Vorschau oder ändern Sie mit Strg + Mausrad einfach die Zoomstufe, um ein Neuladen zu erzwingen.

Wenn Sie Eigenschaften eines referenzierenden Objekts ändern, werden für dieses Objekt die Änderungen in das Template übernommen und die des Prototypen ignoriert.
So können Sie z.B. die Schriftart des Prototypen übernehmen aber eine andere Schriftgröße und Farbe definieren.

To update prototypes you can use all panels in Designers UI. You only can't see it  as long it's located under "referenced objects". For little changes that isn't a problem, but for complex layouts it is. In those cases you should create a new page for temporary use and drag the prototype here for editing.

You wouldn't see you changes immediately at the referening objects as Designer doesn't reload the template.
To force the template reload you can either switch to the XML Source or PDF Preview or you just change the zoom settings with Ctrl + mousewheel.

If you change any property of an referencing object those changes will be saved in the template and the identical properties of the prototype are ignored.
So you can for example use the font of a prototype while using a separate setting for font size and color.


Beispiel-Formular
//
Sample form
https://files.acrobat.com/preview/6dc8d4f7-b7db-4e1b-af51-74230dc969b1

11.07.2012

Die hand-Eigenschaft
//
the hand property

Beim Durchstöbern der XFA Spezifikation bin ich kürzlich auf eine Eigenschaft gestoßen, mit der man die Ausrichtung von Objektkanten steuern kann.
Die "hand"-Eigenschaft bestimmt dabei, ob die Kanten und Ecken eines Objekts mittig auf bzw. links oder rechts von der Objektgrenze gerendert werden.
Das ist praktisch wenn man sehr dicke Kanten eingestellt hat, die aber nicht in das Feld hineinragen sollen und somit Texte überdecken oder eben nicht nach außen überstehen sollen und somit ggf. andere Objekte überdecken.

Die Funktion gibt es auch in anderen Programmen wie z.B. Illustrator, wo sie z.B. "Konturen ausrichten" heißt.
Im Gegensatz zum Designer kann man diese Einstellung dort bequem über einen Dialog einstellen.
Im Designer werden alle Kanten standardmäßig eben, also mittig auf der Objektkante gerendert.
Um das zu ändern bleibt leider nur der Eingriff in die XML-Quelle.
Aber alles halb so schlimm, denn es ist sehr einfach.

While browsing through the XFA specification I recently found a property to control the alignment of object borders.
The "hand" property controls if the borders and edges of an object are rendered even on the object boundary respectively left or right from it.
This is very useful when you use thick borders, that should not project into the field and then potentially overlay texts in the field.
Or, if you want that the borders are only rendered within the object boundaries so they don't cover any other objects in the form.

The same function is available in other apllications such as Illustrator, where it is named "Align Stroke".
In opposition to Designer you there can control this settings easily from a dialog.
Designer always renders all borders even, means in the middle of the object boandary.
To change it your only way is to modify the XML source.
But, worse things happen at sea and this task is just easy.


Auswirkung der "hand"-Eigenschaft auf Objektkanten
//
Effect of the "hand" property on object borders


Händigkeit einstellen
//
Set handedness

Schritt 1 – Rand eines Objekts in der Rand-Pallette auf die gewünschte Stärke einstellen. Standardmäßig wird der Rand immer mittig auf der Objekgrenze angelegt.
//
Step 1 – Set thickness of an objects border in the Border palette. By default the borders are always placed even on the object boundary.


Schritt 2 – Zur XML-Quelle wechseln und das <border>-Tag des Objekts suchen.
//
Step 2 – Switch to XML source and look for the <border> tag of the object.
<field name="Textfeld" y="10mm" x="100mm" w="50mm" h="30mm">
            ...
            <border>
               <edge thickness="1mm"/>
               <corner thickness="1mm"/>
            </border>
         </field>


Schritt 3 – Ergänzen Sie das <border>-Tag um die hand-Eigenschaft mit dem gewünschten Wert.
//
Step 3 – Type the hand property with your desired value into the <border> tag.

<field name="Textfeld" y="10mm" x="100mm" w="50mm" h="30mm">
            ...
            <border hand="left">
               <edge thickness="1mm"/>
               <corner thickness="1mm"/>
            </border>
         </field>


Schritt 4 – Fertig! Die Objektkanten werden nun entsprechend der "hand"-Eigenschaft gerendert..

//
Step 4 – Done! The objekt borders are now rendered accordingly the "hand" property.


22.11.2011

Lesezeichen in XFA-Formularen
//
Bookmarks in XFA forms

Mit der Dokumentation von Features hat es Adobe ja manchmal nicht so.
So liefert die Suche nach dem Wort "bookmark" in der aktuellen ADEP Designer Hilfe genau 0 Treffer.
Dabei ist es sehr wohl möglich, Lesezeichen in XFA-Formularen zu erstellen.
Super praktisch das, kann man sich doch das nachträgliche Hinzufügen über Acrobat sparen.

Lesezeichen werden unter dem extras-Objekt von Teilformularen, Feldern oder Inhaltsbereichen erstellt.
Das können Sie entweder per Hand in der XML-Quelle machen oder dafür auch dieses Makro benutzen.

HINWEIS:
Das Makro funktioniert grundlegend auch mit Designer ES2, d.h. im Formularentwurf werden die Lesezeichen auch erstellt.
Aber Designer ES2 scheint die PDF's anders zu rendern als der ADEP Designer, weshalb die Lesezeichen im fertigen PDF-Formular dann nicht angezeigt werden.
Da es von Designer ES2 mehrere Versionen gibt (mit Acrobat, Stand-Alone, mit Workbench, with SAP ...) kann es sein, dass es in der einen funktioniert und in der anderen nicht.


It seems Adobe sometimes doesn't bother to document features.
So the search for the term "bookmark" in the actual ADEP Designer help returns exactly 0 results.
Thereby it's really possible to create bookmarks in XFA forms.
Damned useful as you don't have to do this in Acrobat afterwards.

Bookmarks are created under the extras object of subforms, fields or areas.
You can do this either manually in the XML source or with this macro.

PLEASE NOTE:
Basically this macro will also work in Designer ES2.
This means the bookmarks are created correctly in the form template.
But, Desiger ES2 seams to render the forms in another way as ADEP Designer does, which why the bookmarks aren't visible in the finale PDF form.
As there are several versions of Designer ES2 available (with Acrobat, stand alone, with Workbench, with SAP ...) it's possible that it works with one them but not with the others .


Funktionsweise des Makro
//
How the macro works

Schritt 1 – Zuerst ein oder mehrere Objekte markieren und Makro aus dem Menü aufrufen
//
Step 1 – Select one or more objects first and then execute macro from menu


Schritt 2 – Flex Dialog des Macros öffnet sich
//
Step 2 – Flex Dialog of the macro opens

Schritt 3 – Einstellungen für das erste Objekt vornehmen und mit ">" zum nächsten wechseln
//
Step 3 – Make settings for the first object and go to the next with ">"

Schritt 4 – Einstellungen für alle weiteren Objekte vornehmen und abschließend mit "OK" bestätigen
//
Step 4 – Make settings for all following objects and finally confirm with "OK"

Schritt 5 – Die Lesezeichen werden unter dem Extras-Objekt eines jeden ausgewählten Objekts erstellt
//
Step 5 – The bookmarks will be created under the extras object of each of the selected objects

Schritt 6 – Im PDF-Viewer werden die Lesezeichen angezeigt
//
Step 6 – The PDF viewer shows the bookmarks


Aktualisierungen in Version 0.6
//
Updates in Version 0.6
  1. Name des Lesezeichens lässt sich auch von einer Objekteigenschaft (Objektname, Klassenname oder Beschriftung) ableiten
    //
    The bookmark name can be deduced from an object property (object name, class name or caption) 
  2. Das Makro kann nun für mehrere, gleichzeitige Auswahlen Lesezeichen mit individuellen Einstellungen erstellen
    //
    The macro now can create bookmarks for several selections at once with individual settings 
  3. Objekte, bei denen keine Lesezeichen unterstützt werden, werden vom Makro ignoriert
    //
    Objects that do not support bookmarks are ignored by the macro 
  4. Wird kein Name für das Lesezeichen eingegeben, wird automatisch der Name "Lesezeichen" verwendet
    //
    When there is no name defined for the bookmark it will be automatically named "bookmark" 

Aktualisierungen in Version 0.7
//
Updates in Version 0.7
  1. Wenn das Marko aufgerufen wird, ohne dass ein Objekt markiert ist, läd das Makro alle unterstützten Objekte aus dem Formularentwurf
    //
    When the macro is executed without any selected object, the macro loads all supported objects from the template 
  2. Das Ändern der Anzeigesprache im Makro verändert nun auch die Sprache in den Berichten usw.
    //
    Changing the UI language of the macro now also changes the languages of the macro reports etc.

Aktualisierungen in Version 0.8
//
Updates in Version 0.8
  1. Unterstützung von Beschriftungen im Rich Text-Format
    //
    Support of captions with Rich Text formatting 
  2. Für eine bessere Übersicht wird der SOM-Ausdruck des ausgewählten Objekts im Makro angezeigt
    //
    The SOM expression of the currently selected object is displayed in the macro for a better overview


Lesezeichen-Makro - Version 0.8
//
Bookmarker Macro - Version 0.8
https://cloud.acrobat.com/file/6c846219-6c0f-4f3d-9769-68bcf2c086aa

13.07.2011

MailTo Maker Macro

Je länger ich mich damit beschäftige, umso nützliche finde ich die Möglichkeit meinen Designer mit Makros auszupeppen.
Heute ein kleines Makro, dass ein E-Mail-Skript zu einer Schaltfläche hinzufügt.

Erklären muss ich da ja nichts, das Makro ist ja selbsterklärend.
Wie Sie das Makro installieren können finden Sie hier.


The more I think of the macro feature in Designer, the more I like to pimp my Designer.
Today a new small macro which adds a mail script to a button.

There is no need to explain something, the macro is self-explanatory.
How to install the macro is described here.

Funktionsweise des Makro
//
How the macro works


Schritt 1 – Objekt(e) markieren und Makro aus dem Menü aufrufen
//
Step 1 – Select object(s) and call macro from menu


Schritt 2 – Flex Dialog des Macros öffnet sich - Standardansicht ohne Benutzereinstellungen
//
Step 2 – Flex Dialog of the macro opens - Default view without user settings

Schritt 3 – Einstellungen vornehmen und mit "OK" bestätigen
//
Step 3 – Make settings and confirm with "OK"


Schritt 4 – Ein Dialog meldet, welche Objekte verändert wurden
//
Step 4 – A dialog shows, which objects have been modified

Schritt 5 – Einstellungen wurden aus dem Flex Dialog in Designer übernommen, das Skript funktioniert auch in der PDF-Vorschau, wird aber noch nicht im Skript-Editor angezeigt
//
Step 5 – Setting from the Flex dialog were applied to Designer, the new script already works in the PDF Preview but it's not shown in the script editor


Schritt 6 – Zur XML-Quelle wechseln und in dem Skript eine kleine Änderung vornehmen (z.B. ein Leerzeichen einfügen)
//
Step 6 – Switch to XML-Source and make a little change to the script (i.e. add a space)


Schritt 7 – Das Skript wird nun auch im Skript-Editor angezeigt
//
Step 7 – The script now is also displayed in the script editor.


Das Makro gibt's hier
//
Get the macro here


28.10.2009

Zeilenumbrüche in Textfeldern von XFA-Formularen erzeugen
//
Create Line Breaks in Text Fields of XFA-Forms

Ein Zeilenumbruch ist schon praktisch und einfach gemacht.
Einfach? Ok, solange Sie den Text selbst in das Feld eintippen schon.

Was aber, wenn Sie einem Textfeld einen Standardtext verpassen.
Sie können diesen nur in ein einzeiliges Feld eingeben, das Zeilenumbrüche einfach ignoriert.
Damit Sie den Standardtext dennoch mit Zeilenumbrüchen versehen können, müssen Sie die XML-Quelle anpassen.
Der Code den Sie dafür brauchen sieht wie folgt aus:


A Line break is a very useful thing in a text field and simple to create.
Simply? Well, simply as long you write the text by yourself it is.

What if you need a large text in a text field?
Of course you can type in a default value, but only into one line that does not recognize any line break.
For a line break in your default text you have to manipulate the XML-source.
The code there for is :

&#xD;


Suchen Sie in der XML-Quelle die Zeile, die den Standardtext enthält und fügen Sie dann den Code überall dort ein, wo Sie einen Zeilenumbruch haben möchten.


Search the line in the XML-source, that contains you default text and paste the code above everywhere into the default text where you need a line break.

<text> the music was &#xD;new black polished chrome &#xD; and came over the summer&#xD; ...

Ihr Standardtext wird dann so dargestellt:


So your default text then looks like:


the music was
new black polished chrome
and came over the summer
like liquid night.

Beispiel/Example:
https://acrobat.com/#d=DYI*KarIrLEmeMstN5YIGw