Suche // Search:

Posts mit dem Label XFA-Form werden angezeigt. Alle Posts anzeigen

27.03.2017

Dynamischer QR-Code in XFA-Formular
//
Dynamic QR code in XFA form

In Zeiten wo jeder ein Smartphone hat, sind QR-Codes ja sehr praktisch geworden.
Nur kann man diese mit Bordmitteln in Designer leider nicht dynamisch erzeugen, Adobe erlaubt das nicht.
Nach etwas Suchen und Experimentieren, konnte ich das Problem aber JavaScript und ein paar eingebetten Teilformularen lösen. Die Lösung basiert auf dem Projekt https://code.google.com/p/jsqrencode/ und steht unter GNU GPL v3-Lizenz frei zur Verfügung.


In times where everybody has a smartphone, QR codes have become very useful.
Too bad you cannot create them dynamically with Designers onboard tools, Adobe doesn't allow it.
But, after some research and testing I found a solution based on JavaScript and a few nested subforms. The solution is based on the project found under https://code.google.com/p/jsqrencode/ and is released under GNU GLP v3 licence.

Mit dem Beispielformular dynamisch, erzeugter QR-Code
//
QR qode created dynamically with the sample form

Aktualisierungen in Version 1.2
//
Updates in Version 1.2

Nach diversen Anfragen und Anregungen von Nutzern habe ich das Skript zur Erzeugung des QR-Codes überarbeitet. Unnötiger Code wurde entfernt und die Ausgabe der QR-Codes optimiert,

After diverse questions and requests by users I've started to go over the script which generates the QR codes. Unneeded code segments where removed and the output of the QR codes optimized.


Beispielformular
//
Sample form

https://files.acrobat.com/a/preview/cb4b04f5-a8bc-48c3-8fc7-de067a709f5a

02.03.2016

Dynamischer PDF417-Code
//
Dynamic PDF417 code

Das heutige Beispiel ist eine Lösung zum Erzeugen von PDF417-Codes in XFA-Formularen ohne die integrierten Papierformular-Barcodes. Der Vorteil ist, diese Lösung basiert allein auf JavaScript und funktioniert somit auch ohne die LiveCycle Reader Extensions. Weiterhin kann man diese Barcode-Lösung sowohl in Acrobat als auch Reader verwenden.

Today's sample is a solution for creating PDF417 codes in XFA forms without the usage of the built-in paper forms barcodes. The benefit is, this works without LiveCycle ReaderExtensions as it is based on JavaScript. This also means you can use the barcode solution in Acrobat and Reader as well.


Beispiel
//
Sample

https://acrobat.adobe.com/link/track?uri=urn:aaid:scds:US:5ec776ed-0670-4bae-af18-555a0a810e5c


Diese Lösung jetzt kaufen
//
Buy this solution now
Sie erhalten ein Fragment mit dieser Lösung für Ihren LiveCycle Designer ES3/ES4 oder AEM Forms Designer.

You'll receive a fragment of this solution for your LiveCycle Designer ES3/ES4 or AEM Forms Designer


20.10.2015

Markierung modifizieren
//
Modify check mark

Kontrollkästchen und Optionsfelder kommen immer sehr farblos daher.
Dieses Beispiel zeigt, wie man ihnen mehr Farbe und einen anderen Markierungsstil verpasst.


Check boxes and radio buttons are by default very colorless.
This sample demonstrates how you can give them more color and different check mark styles.


Beispiel
//
Sample
https://files.acrobat.com/a/preview/786f55fc-242d-460a-badf-12b80a6e28db

20.10.2014

Der Selbermachen-Bugfix 4
//
Do-It-Yourself bugfix 4

Designer bietet ein Werkzeug zum Umwandeln von Word-Dateien in XFA-Formulare — die ConvertWord.exe.
Diese wird automatisch aufgerufen, wenn man mit Designer einer Datei mit folgenden Dateiendungen *.doc, *.docx, *.docm, *.dot oder *.rtf öffnet.

Unter Umständen schlägt die Umwandlung aber immer mit den Umwandlungsfehler: 1 fehl.
Der Rest der Fehlermeldung ist nicht weiter hilfreich, da es sich hier nur eine Zusammenfassung der Konvertierungseinstellungen handelt.

Was also ist hier das Problem?
Nun, in den Dateiimportoptionen gibt es auch eine Dropdown-Liste zum Festlegen ob und wo ein Log der Konvertierung angelegt werden soll.
Das ist die Wurzel allen Übels!
Hat man hier "Protokolldatei erstellen in Designer-Verzeichnis\Log\ConvertWord.log"oder Protokolldatei erstellen in Designer-Verzeichnis\Log\Eingabedatei.log" ausgewählt, hat man das Problem auf ein Verzeichnis zu verweisen, dass nicht existiert.
Standardmäßig existiert im Programmordner von Designer nämlich kein Ordner "Log", daher scheitert der Konvertierungsvorgang.

Konvertierungseinstellungen mit Protokollierung in Designers Programmordner

Umwandlungsfehler: 1
Wenn man nichts protokolliert, oder stattdessen auf das Temp-Verzeichnis verweist, kommt keine Fehlermeldung.


Designer comes with a tool to convert Word files into XFA forms — the ConvertWord.exe.
It's loaded automatically when you open a file with one of the following file extensions: *.doc, *.docx, *.docm, *.dot or *.rtf.

There are situations the conversion fails immediately with Conversion Error:1.
The rest of the message doesn't make cler what's the problem as it only contains a summary of the settings of the conversion.

So, what's the problem.
Well, in the settings dialog there is a drop down list where you set if and where a log file of the conversion will be created.
This is the root of all evil!
When you select either "Log to Designer directory\Log\ConvertWord.log" or "Log to Designer directory\Log\inputfile.log" you'll run into the problem that this points to a directory that does not exist.
By default there is no folder Log in Designers programm folder, so the conversion fails.

Conversion Settings with logging set to Designers programm folder


Conversion Error: 1

If you select the Temp directory for logging or disable it, there is no such error!


Selbermachen-Bugfix – Schritt für Schritt
//
Do-It-Yourself Bugfix – Step by Step


Schritt 1 – Öffnen Sie den Explorer und gehen Sie in das Installationsverzeichnis Ihres Designer z.B. "C:\Program Files (x86)\Adobe\Adobe LiveCycle Designer ES3"
//
Step 1 – Open the Explorer and go to the Designers installation directory like "C:\Program Files (x86)\Adobe\Adobe LiveCycle Designer ES3"


Schritt 2 – Erstellen Sie einen neuen Ordner "Log"
//
Step 2 – Create a new folder named "Log"

Log-Ordner in Designers Programmordner
//
Log folder in Designers programm folder

Schritt 3 – Führen Sie die Dateikonvertierung erneut aus. 
Diese läuft nun durch und erstellt aber keine Log-Datei im neu erstellten Ordner.
Wenn Sie die Logdatei wirklich benötigen, müssen Sie Designer zusätzlich mit Administratorrechten ausführen!
//
Step 3 – Start the file conversion again. 
It now will be processed correctly but it will not create a log file in the newly created folder.
If you really need the log file you will have to run Designer with administrator rights too.


Logdatei der Konvertierung
//
Log file from conversion


01.07.2014

XML-Daten mit XSLT umwandeln
//
Transform XML Data with XSLT

Eine Anfrage eines Kunden hatte mich vor einiger Zeit auf das Thema XSLT (XSL Transformation) gebracht.
Ziel war es Daten in einer Excel-Datei zu pflegen, diese als XML-Datei zu exportieren und diese dann in ein XFA-Formular zu importieren.
XSLT war hier zwingend erforderlich, da Excel nur sehr flache XML-Strukturen unterstützt, die nicht zum Aufbau des XFA-Formulars passen wollten.

Generell bietet sich XSLT immer an wenn importierte/exportierte Daten umstrukturiert werden sollen.
XSLT erlaubt vielfältige Manipulationen, wie z.B. Attribute und Elemente hinzufügen, entfernen oder umbenennen.

Dieses Beispiel soll einmal die Möglichkeiten zeigen, die XSLT bei Verwendung einer Datenbindung mitbringt.


A while ago a customers request brought me to the topic XSLT in XFA forms.
The goal was to fill data in a Excel file, export those data as XML file and import it into a XFA form.
XSLT became neccessary because Excel only allows very plain XML structures that didn't fit the structure of the XFA form.

XSLT is always the first choice if you need to restructure the imported/exported data.
It allows a variety of manipulations as adding, removing or renaming attributes and elements.

In this example I would like to show what you can do with XSLT in a data connection.


1. Als Ausgang dient wieder eine Excel-Datei, in der man Kundendaten pflegt und dann als XML-Datei exportiert.
//
We're starting with an Excel file where we fill some customer data and export those as a XML file.
Excel-Datei mit XML-Zuordnung
//
Excel file with XML mapping

<!-- XML-Struktur aus Excel // XML structure from Excel --> <CustomerList>
    <Customer Firstname="String" Middlename="String" Lastname="String" Sex="String" Birthday="YYYY-MM-DD"/>
    <Info Address="String" ZIP="String" City="String"/>
    </Customer>
    ...
</CustomerList>

2. Das XFA-Formular, in das die Daten dann importiert werden sollen, hat in diesem Fall eine Datenbindung an ein Schema (XSD), das eine andere Struktur als die XML-Datei aufweist.
//
The XFA form has a data connection to a schema (XSD) with a different structure than the XML file we're going to import.

<!-- XML-Struktur in XFA-Formular // XML structure in XFA form -->
<MyCustomers>
  <Customer>
  <General>
   <FirstName>String</FirstName>
   <MiddleName>String</MiddleName>
   <LastName>String</LastName>
   <Gender>String</Gender>
   <BirthDay>YYYY-MM-DD</BirthDay>
  </General>
  <Address>
   <Street>String</Street>
   <ZipCode>String</ZipCode>
   <Town>String</Town>
  </Address>
  <Contact>
   <Phone>String</Phone>
   <Mobile>String</Mobile>
   <Email>String</Email>
  </Contact>
 </Customer>
  ...
</MyCustomers>


3. Damit die eingehenden (importierten) Daten dennoch korrekt zugewiesen werden, wird der Datenverbindung auch ein XSLT-Stylesheet zugewiesen, das die erforderliche Transformierung vornimmt.
Auch die ausgehenden (exportierten) Daten werden umgewandelt, sodass die XML-Datei ebenso eine andere Struktur aufweist.

//
To allow an correct assigment of the incomming (imported) data the data connection additionally uses a XSLT stylesheet to transform the data.
Also the outgoing (exported) data is transformed, so an exported XML file has a different structure too.
Datenverbindung mit XSLT
//
Data Connection with XSLT

<!-- XSLT-Stylesheet -->
<?xml version="1.0" encoding="UTF-8"?>
<xsl:stylesheet version="1.0" xmlns:xsl="http://www.w3.org/1999/XSL/Transform">
 <xsl:output method="xml" version="1.0" encoding="UTF-8" indent="yes"/>
 <xsl:template match="CustomerList">
  <MyCustomers>
   <xsl:comment>NOTE: XML data was transformed by XSLT during import to conform the embedded XML schema</xsl:comment>
   <xsl:variable name="Customer" select="Customer"/>
   <xsl:for-each select="$Customer">
    <xsl:variable name="Info" select="./Info"/>
    <Customer>
     <General>
      <FirstName>
       <xsl:value-of select="@Firstname"/>
      </FirstName>
      <MiddleName>
       <xsl:value-of select="@Middlename"/>
      </MiddleName>
      <LastName>
       <xsl:value-of select="@Lastname"/>
      </LastName>
      <Gender>
       <xsl:value-of select="@Sex"/>
      </Gender>
      <BirthDay>
       <xsl:value-of select="@Birthday"/>
      </BirthDay>
     </General>
     <Address>
      <Street>
       <xsl:value-of select="$Info/@Address"/>
      </Street>
      <ZipCode>
       <xsl:value-of select="$Info/@ZIP"/>
      </ZipCode>
      <Town>
       <xsl:value-of select="$Info/@City"/>
      </Town>
     </Address>
    </Customer>
   </xsl:for-each>
  </MyCustomers>
 </xsl:template>
</xsl:stylesheet>


Beispiel-Dateien
//
Sample files
https://files.acrobat.com/a/preview/509c0f0c-1a3c-4ce5-8f0e-0378f391ef0a

21.01.2014

Gesperrte PDF-Eigenschaften in XFA-Formularen ändern
//
Edit locked PDF properties in XFA forms

Wie schon zuvor beschrieben, ermöglicht das Service Pack 1 für Designer ES4, den Dokumenttitel anstelle des Dateinamens in der Titelleiste des PDF-Viewer anzeigen zu lassen.
Aber, das funktioniert nur mit statischen Formularen und eben nur wenn man ES4 hat.

Nun ist die Verwendung des Dokumenttitels aber die viel schönere Lösung, schließlich erlaubt er Zeichen, die in Dateinamen gar nicht erlaubt sind und Dateinamen sind nicht selten nichtssagend.
Bei regulären PDF's kann man das schnell mit Acrobat in den Dokumenteigenschaften ändern, aber bei XFA-Formularen ist hier alles ausgegraut.

Die Lösung des Problems liegt dennoch in Acrobat und funktioniert mit allen XFA-Formularen.
Gleich mehr dazu.

Ein positiver Nebeneffekt stellt sich hierbei noch ein, denn es lassen sich auch noch viele andere PDF-Eigenschaften ändern, die XFA-Formularen normalerweise vorenthalten werden.
So können Sie wie bei regulären PDF's die Dokumentbeschreibung ändern, festlegen ob Menüsleisten ausgeblendet werden sollen, wie die Seitenanpassung erfolgen soll oder welcher Seitenbereich gedruckt werden soll.


As I've already described earlier the service pack 1 for Designer ES4 allows you to set up your forms to display the document title instead of the file name in the PDF viewers title bar.
But, this only works for static forms and only if you use ES4.

The use of the document title is the much better solution, as it allows the usage of characters you cannot use in file names and those file names are quite often vacuous.
With regular PDF's you would open its document properties in Acrobat to edit the setting, but not so with XFA forms as everything is grayed out then.

The solution that for is also in Acrobat and it works with all XFA forms.
Of which more later.

It additionally has an excellent side effect which will allow you to change many more PDF properties that are regulary kept away from XFA forms.
You'll be able to edit the document description, set which menu bars to hide, how the intial view has to be or what page range should be printed by default.


Schritt 1 – Öffnen Sie Ihre XFA-Formular in Acrobat und öffnen Sie dessen Eigenschaften mit [Strg] + [D].
//
Step 1 – Open your XFA form in Acrobat and then open its properties by pressing [Ctrl] + [D].
Gesperrte Dokumenteigenschaften in XFA-Formualren
//
Locked PDF Properties in XFA forms


Schritt 2 – Unter dem Reiter [Sicherheit] ändern Sie das Sicherheitssystem auf „Kennwortschutz“.
//
Step 2 – Under the [Security] tab change the Security Method to 'Password Security'.


Schritt 3 – Geben Sie ein Passwort zum Öffnen des Dokuments ein und bestätigen Sie es im folgenden Dialog. Das Passwort muss nicht sicher sein — ein einzelnes Zeichen reicht hier völlig aus.
//
Step 3 – Enter a password to open the document and confirm it in the following dialog. You don't have to enter any strong password — a single character is enough.


Schritt 4 – Klicken Sie nun rechts auf die Schaltfläche [Einstellungen] ändern.
//
Step 4 – Click on the [Change Settings] button on the right.
Dokumenteinschränkungen bestehen noch
//
Document Restrictions are still there


Schritt 5 – In diesem Dialog müssen Sie nichts machen, klicken Sie einfach auf [OK] um ihn zu schließen. Danach passiert etwas Unerwartetes …
//
Step 5 – In this dialog you don't need to do anything, just click [OK] to close it. After that something unexpected happens …
Hier gibt's nichts zu tun, einfach nur OK klicken
//
Nothing to do here, just click OK

Schritt 6 – … Acrobat entfernt fasst alle Dokumenteinschräkungen vom Formular. Das ist genau was wir brauchen, also Klicken Sie auf [OK], um diese Dokumenteigenschaften zu speichern.
//
Step 6 – … Acrobat removes most of the Document Restrictions from the form. That's exactly what we need, so click [OK] to save the current document properties.
Dokumenteinschränkungen wurden ausgehoben
//
Document Restrictions are removed

Schritt 7 – Nun öffnen Sie die Dokumenteigenschaften erneut. Sie sind nun in der Lage Elemente unter den Reitern [Beschreibung], [Ansicht bei Öffnen] usw. zu ändern. Zum Beispiel können Sie den Dokumententitel anstelle des Dateinamens anzeigen lassen oder die Menüleiste beim Öffnen des Formulars ausblenden lassen.
//
Step 7 – Now open the Document Properties again. You're able to edit different elements under the [Description], [Inital View] tab etc. For example you can select the document title to be displayed instead of the file name or hide the menu bar when the form opens.
Felder der Dokumentbeschreibung veränderbar
//
Fields of Document Description now editable

Ansicht beim Öffnen veränderbar
//
Initial View Settings editable

Schritt 8 – Nachdem Sie alle Eigenschaften geändert haben, setzen Sie das Sicherheitssystem wieder auf keine Sicherheit und speichern das Formular ab.
//
Step 8 – After you applied all changes set the Security Method back to no Security and then save the form.


Beispielformular
https://files.acrobat.com/preview/2b06f176-acaf-4d6a-820b-fc881046b1e5
//
Sample form
https://files.acrobat.com/preview/b7c0ac80-23c2-4747-b37c-4254d7da002c


10.10.2013

Individuelle Masterseiten-Zähler
//
Individual Master Page Counter

Immer wieder fragen Anwender, wie man in einem XFA-Formulare für jede Masterseite einen eigenen Seitenzähler anlegen kann.
Die üblichen Methoden wie xfa.layout.page(this) oder xfa.layout.pageCount() helfen hier nicht weiter.

Die Lösung ist dennoch simpel.
Eine Masterseite hat wie jedes andere Objekt auch eine Indexnummer, beginnend bei 0 für die erste Instanz.
Auf jeder Seite, auf der diese Masterseite erneut auftritt, erhöht sich die Indexnummer um 1.

Platziert man nun ein Feld auf der Masterseite, kann man den Index der Masterseite einfach per Skript im layoutReady-Event fragen.

In FormCalc sieht das dann so aus:
$ = $.parent.index + 1

In JavaScript entsprechend so:
this.rawValue = this.parent.index + 1;


Um nun noch die Gesamtzahl aller Instanzen der Masterseite zu erhalten, zählt man einfach das auftreten der Masterseiten.
Dafür bietet sich die resolveNodes()-Methode an.

In FormCalc:
$ = xfa.resolveNodes(somExpression).length

In JavaScript:
this.rawValue = xfa.resolveNodes(somExpression).length;


Users frequently ask how to create individual page counts for each master page in a XFA form.
The common methods like xfa.layout.page(this) or xfa.layout.pageCount() don't help here.

The solution however is very simple:
As any object a master page has a index number for each occurence, which always begins at 0 for the first instance.
On each page the master page occurs again the index is increased by 1.

If you place a field on your master page you can determine its index easily with a script in the layoutReady Event.

In FormCalc it looks this way:
$ = $.parent.index + 1

In JavaScript that way:
this.rawValue = this.parent.index + 1;


Now you only need to determine how often the master page occurs.
Therefore you can use the resolveNodes() method, as it allows us to count repeatable objects.

In FormCalc:
$ = xfa.resolveNodes(somExpression).length

In JavaScript:
this.rawValue = xfa.resolveNodes(somExpression).length;


Beispiel-Formular
//
Sample form

https://files.acrobat.com/preview/99815d28-441f-47e4-a05b-88e478187157


22.11.2011

Lesezeichen in XFA-Formularen
//
Bookmarks in XFA forms

Mit der Dokumentation von Features hat es Adobe ja manchmal nicht so.
So liefert die Suche nach dem Wort "bookmark" in der aktuellen ADEP Designer Hilfe genau 0 Treffer.
Dabei ist es sehr wohl möglich, Lesezeichen in XFA-Formularen zu erstellen.
Super praktisch das, kann man sich doch das nachträgliche Hinzufügen über Acrobat sparen.

Lesezeichen werden unter dem extras-Objekt von Teilformularen, Feldern oder Inhaltsbereichen erstellt.
Das können Sie entweder per Hand in der XML-Quelle machen oder dafür auch dieses Makro benutzen.

HINWEIS:
Das Makro funktioniert grundlegend auch mit Designer ES2, d.h. im Formularentwurf werden die Lesezeichen auch erstellt.
Aber Designer ES2 scheint die PDF's anders zu rendern als der ADEP Designer, weshalb die Lesezeichen im fertigen PDF-Formular dann nicht angezeigt werden.
Da es von Designer ES2 mehrere Versionen gibt (mit Acrobat, Stand-Alone, mit Workbench, with SAP ...) kann es sein, dass es in der einen funktioniert und in der anderen nicht.


It seems Adobe sometimes doesn't bother to document features.
So the search for the term "bookmark" in the actual ADEP Designer help returns exactly 0 results.
Thereby it's really possible to create bookmarks in XFA forms.
Damned useful as you don't have to do this in Acrobat afterwards.

Bookmarks are created under the extras object of subforms, fields or areas.
You can do this either manually in the XML source or with this macro.

PLEASE NOTE:
Basically this macro will also work in Designer ES2.
This means the bookmarks are created correctly in the form template.
But, Desiger ES2 seams to render the forms in another way as ADEP Designer does, which why the bookmarks aren't visible in the finale PDF form.
As there are several versions of Designer ES2 available (with Acrobat, stand alone, with Workbench, with SAP ...) it's possible that it works with one them but not with the others .


Funktionsweise des Makro
//
How the macro works

Schritt 1 – Zuerst ein oder mehrere Objekte markieren und Makro aus dem Menü aufrufen
//
Step 1 – Select one or more objects first and then execute macro from menu


Schritt 2 – Flex Dialog des Macros öffnet sich
//
Step 2 – Flex Dialog of the macro opens

Schritt 3 – Einstellungen für das erste Objekt vornehmen und mit ">" zum nächsten wechseln
//
Step 3 – Make settings for the first object and go to the next with ">"

Schritt 4 – Einstellungen für alle weiteren Objekte vornehmen und abschließend mit "OK" bestätigen
//
Step 4 – Make settings for all following objects and finally confirm with "OK"

Schritt 5 – Die Lesezeichen werden unter dem Extras-Objekt eines jeden ausgewählten Objekts erstellt
//
Step 5 – The bookmarks will be created under the extras object of each of the selected objects

Schritt 6 – Im PDF-Viewer werden die Lesezeichen angezeigt
//
Step 6 – The PDF viewer shows the bookmarks


Aktualisierungen in Version 0.6
//
Updates in Version 0.6
  1. Name des Lesezeichens lässt sich auch von einer Objekteigenschaft (Objektname, Klassenname oder Beschriftung) ableiten
    //
    The bookmark name can be deduced from an object property (object name, class name or caption) 
  2. Das Makro kann nun für mehrere, gleichzeitige Auswahlen Lesezeichen mit individuellen Einstellungen erstellen
    //
    The macro now can create bookmarks for several selections at once with individual settings 
  3. Objekte, bei denen keine Lesezeichen unterstützt werden, werden vom Makro ignoriert
    //
    Objects that do not support bookmarks are ignored by the macro 
  4. Wird kein Name für das Lesezeichen eingegeben, wird automatisch der Name "Lesezeichen" verwendet
    //
    When there is no name defined for the bookmark it will be automatically named "bookmark" 

Aktualisierungen in Version 0.7
//
Updates in Version 0.7
  1. Wenn das Marko aufgerufen wird, ohne dass ein Objekt markiert ist, läd das Makro alle unterstützten Objekte aus dem Formularentwurf
    //
    When the macro is executed without any selected object, the macro loads all supported objects from the template 
  2. Das Ändern der Anzeigesprache im Makro verändert nun auch die Sprache in den Berichten usw.
    //
    Changing the UI language of the macro now also changes the languages of the macro reports etc.

Aktualisierungen in Version 0.8
//
Updates in Version 0.8
  1. Unterstützung von Beschriftungen im Rich Text-Format
    //
    Support of captions with Rich Text formatting 
  2. Für eine bessere Übersicht wird der SOM-Ausdruck des ausgewählten Objekts im Makro angezeigt
    //
    The SOM expression of the currently selected object is displayed in the macro for a better overview


Lesezeichen-Makro - Version 0.8
//
Bookmarker Macro - Version 0.8
https://cloud.acrobat.com/file/6c846219-6c0f-4f3d-9769-68bcf2c086aa

07.11.2011

Feld Designer Makro
//
Field Designer Macro

Dass Designer ES2 ein API für Plug-Ins hat, wissen wohl nur die Wenigsten.
Tatsächlich kenne ich bislang nur eine Person, die davon berichtet hat - John Brinkman.
Höchste Zeit sich auch mal damit zu beschäftigen.

Also, sie können für Designer eigene kleine Plug-Ins basteln, um sich z.B. ungeliebte Aufgaben zu erleichtern.
Aber, das ist nicht gerade simpel.
Zum einen ist diese API nicht großartig dokumentiert, da sie noch im Beta-Stadium ist.
Zum anderen brauchen Sie andere Programme wie den Adobe Flex / Flash Builder, um Plug-Ins mit Benutzeroberfläche zu erstellen, denn Designer ES2 nutzt dafür Flex bzw. Flash.
Wenn Sie keine Benutzeroberfläche brauchen, dann reicht auch JavaScript, denn dies wird zur Steuerung der API-Funktionen verwendet.

Ich habe mich mal daran versucht, um Ihnen zu zeigen was möglich ist, und ein Makro erstellt, mit dem Sie die Kanten, Ecken und Beschriftung von Objekten bearbeiten können.
An die Flex-Entwickler — Tschuldigung für meine begrenzten Flex-Fertigkeiten ;-)

Um es zu installieren, machen Sie Folgendes ...
... bei Designer ES2 (9.x):
  1. Navigieren Sie zum Programmordner von Designer ES2 z.B:
    C:\Program Files (x86)\Adobe\Adobe LiveCycle Designer ES2\ (bei Stand-Alone-Installation)
    oder
    C:\Program Files (x86)\Adobe\Acrobat 10.0\Designer 9.0\ (bei Installation zusammen mit Acrobat)
  2. Erstellen Sie einen neuen Ordner "scripts".
  3. Erstellen Sie in "scripts" einen Unterorder mit beliebigen Namen und kopieren Sie dort hin die *.js und *.swf-Dateien.
  4. Starten Sie Designer neu.
  5. Sie können dann das Makro unter "Extras" > "Scripts" > "Makroname" ausführen.
... bei ADEP Designer (10.x):
  1. Navigieren Sie zum Programmordner von ADEP Designer z.B:
    C:\Program Files (x86)\Adobe Digital Enterprise Platform\Designer 10.0\ (bei Stand-Alone-Installation)
    oder
    C:\Program Files (x86)\Adobe Digital Enterprise Platform\Workbench 10.0\Designer 10.0\ (bei Installation zusammen mit Workbench)
  2. Erstellen Sie einen neuen Ordner "macros".
  3. Erstellen Sie in "macros" einen Unterorder mit beliebigen Namen und kopieren Sie dort hin die *.js , die *.swf und die macros.xml-Dateien.
  4. Sie können dann das Makro unter "Extras" > "Macros" > "Makroname" ausführen.


Only a few people possibly know that there is an API for Plug-Ins in Designer.
In fact, I actually only know one person, who already has spoken of it - John Brinkman.

Ok, you can create your own little Plug-Ins for Designer, maybe to streamline unpopular workflows or whatever.
But, this isn't a simple task.
On one hand, the API isn't documented very well so far as it's still in beta.
On the other hand you're possibly will need other applications like Adobe Flex / Flash Builder to create Plug-Ins with a graphical user interface as Designer ES2 uses Flex or Flash for this purpose.
If you don't need an UI then JavaScript is all you need because this is used for the API functions.

I have tried myself in this task to show you what is possible and I designed a Macro which you can use to edit the edges, corners and caption of objects.
@ Flex developers — Apologies for my limited Flex skills ;-)

To install macros, you have to do the following ...

... for Designer ES2 (9.x):
  1. Navigate to the programm folder of Designer ES2 like:
    C:\Program Files (x86)\Adobe\Adobe LiveCycle Designer ES2\ (stand-alone installation)
    or
    C:\Program Files (x86)\Adobe\Acrobat 10.0\Designer 9.0\ (installation together with Acrobat)
  2. Create a new Folder "scripts".
  3. In that folder create a subfolder with any name and copy the *.js and '.swf-files in that folder.
  4. Restart Designer.
  5. Now you can execute the macro from "Tools" > "Scripts" > "Macro name".

... for ADEP Designer (10.x):
  1. Navigate to the programm folder of ADEP Designer like:
    C:\Program Files (x86)\Adobe Digital Enterprise Platform\Designer 10.0\ (stand-alone installation)
    or
    C:\Program Files (x86)\Adobe Digital Enterprise Platform\Workbench 10.0\Designer 10.0\ (installation together with Workbench)
  2. Create a new Folder "macros".
  3. In that folder create a subfolder with any name and copy the *.js and *.swf- and macro.xml files in that folder.
  4. Now you can execute the macro from "Tools" > "Macros" > "Macro name".


Funktionsweise des Makro
//
How the macro works

Schritt 1 – Zuerst Objekt(e) markieren und Makro aus dem Menü aufrufen
//
Step 1 – Select object(s) first and then execute macro from menu


Schritt 2 – Flex Dialog des Macros öffnet sich - Standardansicht ohne Benutzereinstellungen
//
Step 2 – Flex Dialog of the macro opens - Default view without user settings

Schritt 3 – Einstellungen vornehmen und mit "OK" bestätigen
//
Step 3 – Make settings and confirm with "OK"

Schritt 4 – Ein Dialog meldet, welche Objekte verändert wurden
//
Step 4 – A dialog shows, which objects have been modified

Schritt 5 – Einstellungen wurden aus dem Flex Dialog in Designer übernommen
//
Step 5 – Settings from the Flex dialog were applied to Designer


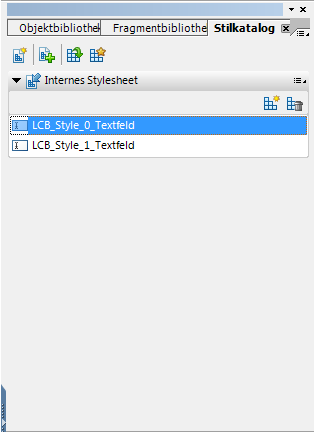
Schritt 6 – Einstellungen wurden (wenn ausgewählt) in ein internes Stylesheet im Template gespeichert und werden in Designer ES2 als Referenzierte Objekte angezeigt bzw. im Stilkatalog von ADEP Designer.
//
Step 6 – Settings were (if selected) saved into an internal stylesheet in the template and  are displayen as references objects in Designer ES2 respectively in the style catalogue in ADEP Designer.
Stylesheet im Template // Style sheet in the template

Designer ES2
Stylesheet als refereziertes Objekt // Style sheet as referenced object
ADEP Designer
Stylesheets in Stilkatalog // Style sheets in style catalogue

Schritt 7 – Mit der usehref-Methode kann der Stile nun auf beliebige andere Objekte kopiert werden.
In Designer ES2 muss das per Hand in der XML-Quelle gemacht werden, in ADEP Designer geht das mit dem Stileditor.
//
Step 7 – With the usehref method you can copy the style on any other objects.
In Designer ES2 you have to do this manually in the XML source, in ADEP Designer you can use the Style catalogue.
Referenzsyntax für Zugriff auf Stylesheet // Reference syntax to style sheet
usehref=".#som($template.#subform.designer__stylesheet.LCB_Style_0_Textfeld)"


Aktualisierungen in Version 0.6
//
Updates in Version 0.6

  1. Sprache der Benutzeroberfläche kann auf englisch bzw. deutsch umgestellt werden
    //
    UI language can be changed to german respectively english 
  2. Füllfarbe für das Formularfeld und den Eingabebereich kann individuell festgelegt werden
    //
    Fill color for the form field and the ui can be set induvidually 
  3. Linienart für Kanten und Ecken kann individuell festgelegt werden
    //
    Line type for the edges and corners can be defined individually 
  4. Schriftart, -größe und -stil für die Beschriftung sind definierbar
    //
    Font, size and style of the caption can be defined


Aktualisierungen in Version 0.7
//
Updates in Version 0.7

  1.  Füllfarbe für Objekt und Eingabebereich kann deaktiviert werden
    //
    Fill color for object and UI can be deaktivated 
  2. Berücksichtigung der Eigenheiten von Flashfeldern
    //
    Consideration of peculiarities of Flash fields

Aktualisierungen in Version 0.8
//
Updates in Version 0.8

  1. Verbesserte Prüfungen nach unterstützen Objekttypen
    //
    Improved validation of supported object types 
  2. Beispieltext der Beschriftung kann ignoriert oder übernommen werden
    //
    Sample text for caption can be ignored or adopted 
  3. Einstellungen können als Prototypen (Stile) im internen Stylesheet gespeichert werden (auch in ES2)
    //
    Settings can be saved as pototypes (styles) within the internal stylesheet (even in ES2)

Aktualisierungen in Version 0.9.1
//
Updates in Version 0.9.1

  1. Stylesheets werden nun nach Feldtypen benannt (Textfeld, Numerisches Feld usw.)
    //
    Style sheets now are named by the field type (text field, numeric field etc.) 
  2. Skripte können bei Bedarf mit in Stylesheets übernommen werden, werden aber standarmäßig entfernt
    //
    Scripts will be removed by default but can be inherited into the style sheet if needed
  3. Das Makro ignoriert nun Skriptobjekte und ist somit wesentlich schneller
    //
    The macro now ignores script objects which why it it much faster 
  4. Unbenannte Felder führen nicht mehr dazu, dass das Erstellen eines Stylesheets scheitert
    //
    Unnamed fields do not cause the macro to fail when creating a style sheet
  5. Der Flex-Dialog funktioniert nun auch wieder in Designer ES2
    //
    The Flex dialog is now functioning in Designer ES2 again

Feld Designer-Makro - Version 0.9.1
//
Field Designer Macro - Version 0.9.1
https://cloud.acrobat.com/file/d9e175c9-acbc-426d-baf7-9b30360e76ab